
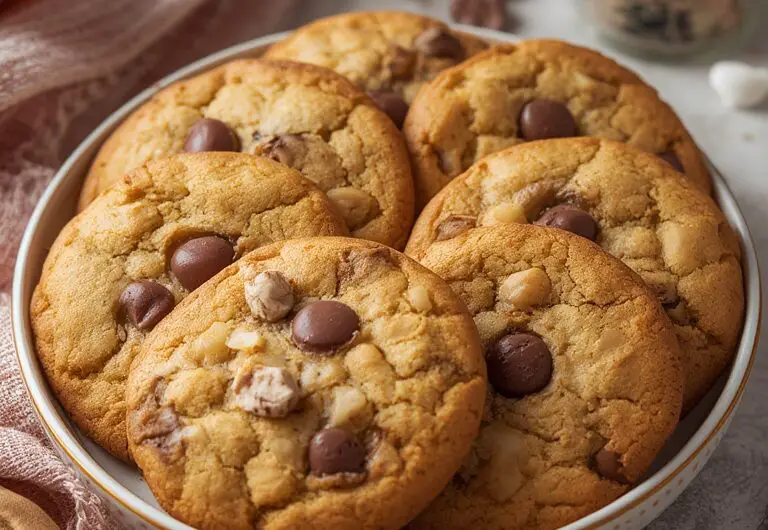
Have You Been Searching for That Ideal Cookie Recipe?
Are you on a quest for the ultimate chocolate chip cookie that’s perfectly soft in the center with slightly crisp edges? That elusive balance of sweetness, butter, and melty chocolate chips that makes your taste buds dance? Look no further! This recipe for the perfect soft Cookies will transform your home baking, chocolate chip, chewy cookies experience.
After testing dozens of variations and techniques, I’ve discovered the secret to creating cookies that stay soft for days (if they last that long!). The combination of brown sugar, a specific mixing technique, and the perfect baking time results in a cookie that’s crisp around the edges but maintains that sought-after chewy center that cookie enthusiasts crave.
Whether you’re baking for a special occasion, weekly meal prep, or simply satisfying a sweet tooth craving, this recipe delivers consistent, delicious results every time. Let’s dive into what makes these chocolate chip cookies absolutely perfect!
Ingredients
For 24 medium cookies, you’ll need:
- 2¼ cups (280g) all-purpose flour
- 1 teaspoon baking soda
- 1 teaspoon salt
- 1 cup (226g) unsalted butter, softened to room temperature
- ¾ cup (150g) granulated sugar
- ¾ cup (165g) packed light brown sugar
- 2 large eggs, at room temperature
- 2 teaspoons pure vanilla extract
- 2 cups (340g) semi-sweet chocolate chips
- 1 cup (120g) chopped walnuts or pecans (optional)
Ingredient Notes:
- For extra-rich cookies, substitute ¼ cup of the semi-sweet chocolate chips with dark chocolate chunks.
- If you prefer a less sweet cookie, reduce both sugars to ⅔ cup each.
- For a hint of complexity, add ½ teaspoon of espresso powder to enhance the chocolate flavor without adding coffee taste.
- Brown butter variation: For a nuttier flavor profile, brown the butter before cooling to room temperature and proceeding with the recipe.
Timing
- Prep Time: 15 minutes (plus 2 hours of chilling time)
- Cooking Time: 10-12 minutes
- Total Time: 2 hours 30 minutes (including chilling)
- Active Time: 25 minutes
While the 2-hour chilling time might seem lengthy, it’s 60% less time than traditional overnight chilling recipes require. This rest period allows the flavors to develop and prevents the cookies from spreading too thin during baking – a small investment for significantly improved texture and flavor!
Step-by-Step Instructions
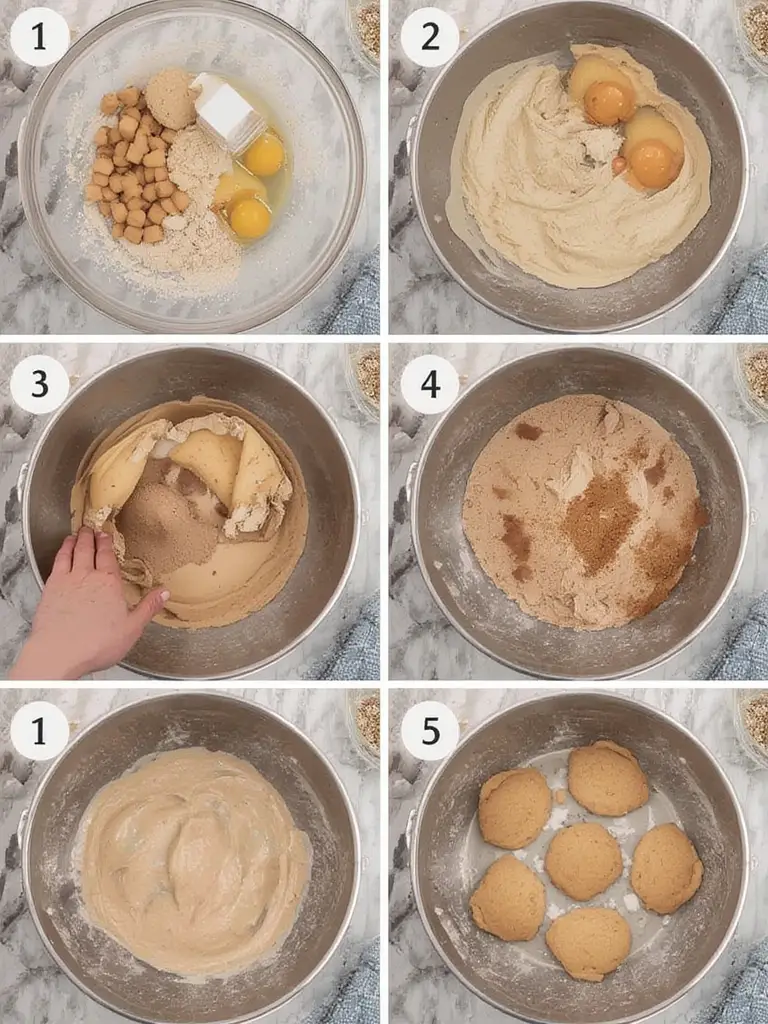
Step 1: Prepare Your Dry Ingredients
In a medium bowl, whisk together the flour, baking soda, and salt. This even distribution of leavening agents ensures uniform rising throughout your cookies. Pro tip: Sift the flour for extra-light cookies that have a more tender crumb.
Step 2: Cream the Butter and Sugars
In a large bowl using a stand mixer or hand mixer, beat the softened butter on medium speed for 1 minute until smooth. Add both sugars and beat for 2 minutes until the mixture becomes light and fluffy. The air incorporated during this stage creates tiny pockets that contribute to the perfect texture. Don’t rush this step – proper creaming is key to soft cookies!
Step 3: Add Eggs and Vanilla
Add eggs one at a time, beating well after each addition. Scrape down the sides of the bowl as needed. Mix in the vanilla extract. The mixture should look smooth and slightly increased in volume. For an extra touch of richness, use vanilla bean paste instead of extract.
Step 4: Combine Wet and Dry Ingredients
Add the dry ingredients to the wet ingredients in three portions, mixing on low speed just until combined after each addition. Over-mixing develops gluten, leading to tough cookies, so stop mixing as soon as you no longer see flour streaks.
Step 5: Fold in Chocolate Chips and Nuts
Using a spatula, gently fold in the chocolate chips and nuts (if using). For picture-perfect cookies, reserve about ¼ cup of chocolate chips to press into the tops of the dough balls before baking.
Step 6: Chill the Dough
Cover the dough tightly with plastic wrap and refrigerate for at least 2 hours, or up to 4 days. This crucial step solidifies the fats and allows the flour to fully hydrate, resulting in thicker, softer cookies with deeper flavor.
Step 7: Preheat and Prepare
Preheat your oven to 350°F (175°C) and line baking sheets with parchment paper. Remove dough from refrigerator about 10 minutes before scooping to make it easier to work with.
Step 8: Shape and Bake
Using a cookie scoop or tablespoon, form dough balls about 1½ tablespoons in size. Place on prepared baking sheets about 2 inches apart. Press reserved chocolate chips into tops if desired. Bake for 10-12 minutes until edges are set but centers still look slightly underbaked. The cookies will continue cooking on the hot baking sheet.
Step 9: Cool and Enjoy
Allow cookies to cool on the baking sheet for 5 minutes before transferring to a wire rack to cool completely. This resting period is essential for the cookies to set up properly without breaking.
Nutritional Information
Per cookie (based on 24 cookies without nuts):
- Calories: 225
- Protein: 2.5g
- Carbohydrates: 28g
- Fat: 12g
- Fiber: 1.2g
- Sugar: 18g
- Calcium: 20mg
- Iron: 1.2mg
Healthier Alternatives for the Recipe
- Reduced Sugar Option: Decrease both sugars to ½ cup each and add ¼ teaspoon of stevia for sweetness.
- Gluten-Free Version: Substitute all-purpose flour with a 1:1 gluten-free baking blend.
- Vegan Adaptation: Replace butter with plant-based butter sticks (not spreadable tub varieties), use flax eggs (1 tablespoon ground flaxseed + 3 tablespoons water = 1 egg), and ensure your chocolate chips are dairy-free.
- Whole Grain Boost: Substitute half the all-purpose flour with white whole wheat flour for added fiber without dramatically changing texture.
- Lower-Fat Option: Replace half the butter with unsweetened applesauce, though this will change the texture somewhat.
Serving Suggestions
- Serve warm cookies with a small scoop of vanilla bean ice cream on top for a simple but impressive dessert.
- Create cookie sandwiches by spreading a thin layer of peanut butter or Nutella between two cooled cookies.
- Pair with a glass of cold milk, hot coffee, or chamomile tea for the ultimate comfort food experience.
- For special occasions, drizzle cooled cookies with melted white chocolate and a sprinkle of sea salt.
- Stack 3-4 cookies in clear cellophane bags tied with ribbon for heartfelt homemade gifts.
Common Mistakes to Avoid
- Using cold ingredients: Room temperature eggs and butter are crucial for proper incorporation and texture.
- Skipping the chilling step: This results in flat, spread-out cookies that lack the perfect chewy center.
- Overbaking: Remove cookies when edges are set but centers still look slightly underdone – they’ll continue baking on the hot sheet.
- Inaccurate measuring: For best results, weigh ingredients rather than using volume measurements.
- Opening the oven door too early: This causes temperature fluctuations that lead to uneven baking.
Storing Tips for the Recipe
- Counter storage: Keep in an airtight container at room temperature with a slice of bread to maintain softness for up to 5 days.
- Refrigerator: Store baked cookies in an airtight container for up to 1 week. Allow to come to room temperature before serving for best texture.
- Freezer – baked cookies: Freeze completely cooled cookies in a single layer, then transfer to a freezer bag for up to 3 months. Thaw at room temperature or microwave for 15-20 seconds.
- Freezer – cookie dough: Form dough balls and freeze on a baking sheet, then transfer to a freezer bag for up to 3 months. Bake directly from frozen, adding 1-2 minutes to the baking time.
- Make-ahead tip: Prepare the dough up to 4 days in advance and keep refrigerated until ready to bake.
Conclusion
These perfect soft chocolate chip cookies represent the culmination of countless test batches and technique refinements to create what might just be your new favorite cookie recipe. The balanced sweetness, melty chocolate, and that irresistible soft-yet-chewy texture make these cookies suitable for everything from afterschool treats to impressive dinner party desserts.
Remember, the little details matter – room temperature ingredients, proper creaming, adequate chilling time, and careful baking all contribute to cookie perfection. Don’t be afraid to make this recipe your own with the suggested variations or your personal creative touches.
Have you tried this recipe? I’d love to see your results! Tag @RecipeClassic on social media or leave a comment below with your experience and any questions. And if you’re looking for more delicious dessert recipes, be sure to subscribe to our newsletter for weekly inspiration!
FAQs
Q: Can I make the cookie dough ahead of time?
A: Absolutely! The dough can be refrigerated for up to 4 days or frozen for up to 3 months. In fact, many bakers find the flavor improves with 24-48 hours of refrigeration.
Q: Why did my cookies spread too much?
A: This is usually caused by butter that’s too warm, insufficient chilling time, or too little flour. Make sure to measure ingredients precisely and chill the dough for at least 2 hours.
Q: Can I double this recipe?
A: Yes! This recipe doubles beautifully. Just ensure you have enough refrigerator space for chilling and don’t overload your mixer.
Q: How do I know when the cookies are done baking?
A: The edges should be golden and set, while the centers still look slightly underbaked and soft. They will continue to cook on the hot baking sheet after removal from the oven.
Q: Why add cornstarch to chocolate chip cookies?
A: Though this recipe doesn’t include it, cornstarch is sometimes added to create an extra-soft texture. If desired, you can substitute 2 tablespoons of the flour with cornstarch for an even softer cookie.